Populate the Account list with the departments within your facility. This list will be available in the Cost Center, Responsible Center, and Department fields throughout AIMS.
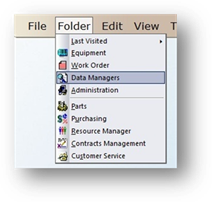
1. Click on the toolbar Data Managers button or use the menu Folder > Data Managers. The Control opens to the Account Tab.
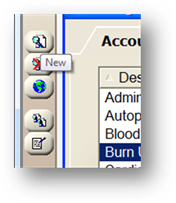
2. Click the New button or use the menu Edit > Add Record. The Control opens to the General Information tab.
![]()
General Information
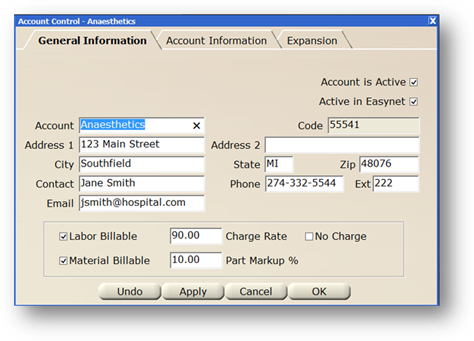
1. Enter an Account Name then press Tab.
2. Accept the Code default or enter a code. If your organization uses their own account codes, be sure to change the code to your organization’s code before saving the record.
3. Select Active in EasyNet to include the Cost Center in the EasyNet (optional component) request valid entry list.
4. Enter the Street Address, City, State, and Zip Code for the account.
5. Enter the department’s Main Contact.
6. Enter the Phone Number and Extension for the main contact or department.
7. Enter the Email Address of the main contact.
8. Enable Labor Billable to flag all work order labor lines for the Account as Billable.
9. Enable Material Billable to flag all work order material lines for the Account as Billable.
NOTE: If Billable is checked in Administration, it is not necessary to check each individual Account.
10. Enter the Charge Rate for the Account or select No Charge.
NOTE: AIMS determines the charge rate for labor applied to work orders based on a user-defined charge rate hierarchy.
11. Enter a Part Markup %. This is the mark up percentage, over the retail price that will be automatically added to Parts when they are applied to Work Orders for the Account.
Account Information
Configure additional department (account) defaults by clicking the Account Information tab.
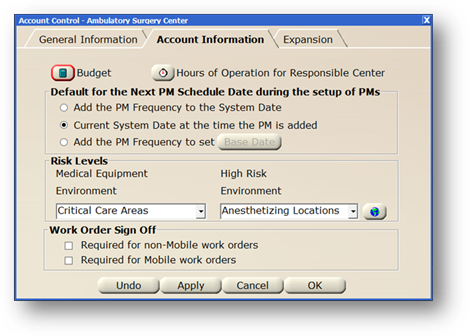
1. To define a Budget, click the Budget button.
2. Enter Hours of Operation for the Cost Center.
3. Select an option to determine the default PM dates on newly added PM Schedules.
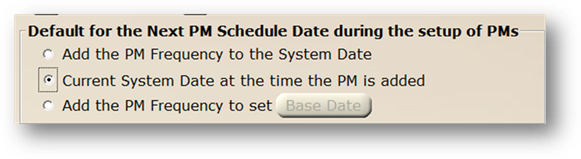
⋅ Add the PM Frequency to the System Date- Select this option to use the system date plus the PM Frequency as the next PM Schedule. For example: A six month PM is added on April 1, 2010, the Next Due Date on the PM Schedule will be October 1, 2010; 6 months after the day the PM was added.
⋅ Current System Date at the Time the PM is Added (Default)- Select this option to set the next PM due date as the current system date when new equipment is added to the account on April 1, 2010, The Next Due Date on the PM Schedule will be April 1, 2010.
⋅ Add the PM Frequency to Set Base Date- AIMS will assign the Next PM Schedule date based on the Base Date plus the PM Frequency when new equipment is added. For example the equipment’s cost center has a base date set to January 1, 2010. A six month PM is entered on April 1, 2010. The Next Due Date on the PM Schedule will be July 1, 2010 or January 1, 2010 plus six months. If the same device was entered on August 2, 2010, the Next Due Date would be January 1, 2011. AIMS will continue to increment until it finds a date in the future. Use this option if your organization schedules PMs based on the cost center the equipment is in.
4. Configure Risk Levels. These settings will default on newly added equipment. (Your selections may vary).
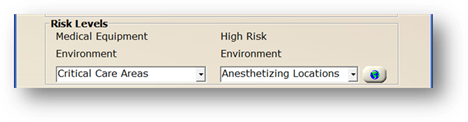
⋅ Select from the valid entry lists.
⋅ Click the Global button to apply the changes to existing equipment assigned to the account. A Yes/No response is required. For CCS/ Multi-User, the Facility Selection dialog opens.
5. Check Required for non-Mobile work orders to require Work Order Sign Off on work orders in AIMS. This will require a signature prior to closing work orders.
NOTE: Customer Signoff on Work Orders option in System Defaults must be activated before this option will be available.
6. Check Required for Mobile work orders to require Work Order Sign Off on work orders in AIMS Mobile . This will require sign off prior to closing work orders from PDA devices.
NOTE: Customer Service on Work Orders option in System Defaults must be activated before this option will be available.