
1. Click the Apply Labor button.

2. Select type of labor that is to be applied as In-House, Contract, or Non-Contract Service.
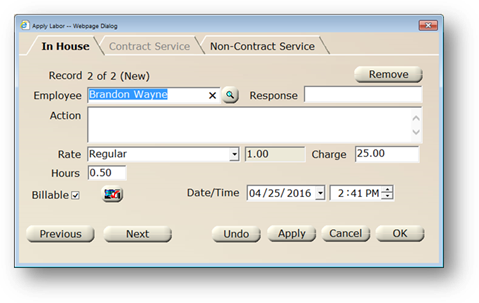
In House Labor
Use the In House labor tab for applying time by employees of your organization.
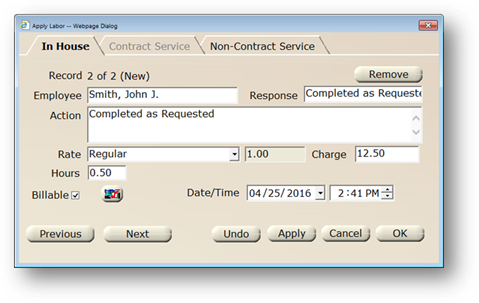
1. Select an Employee from the valid entry list. This will default to the individual assigned to the work order, if any.
2. Select a Response from the valid entry list.
3. Accept the Action default or enter additional information describing work that has been completed. This is useful later on if you need to reference the work order to see what had been done.
4. Accept Rate default or select from the valid entry list of pre-defined rates.
5. Accept Charge default rate or enter the billable charge for completed work.
6. Enter the Hours that were needed to complete the work order.
7. Check the Billable Box if this labor is to be indicated as billable. This can be used on reports if you want to filter out only billable labor lines.
8. Accept Date default (current date) or enter the date that the work was done.
9. Accept Time default (current time) or enter the time the work was done.
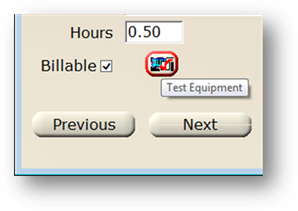
10. If a Test Device was used for the Work Order, enter the information by clicking on the Test Equipment Button.
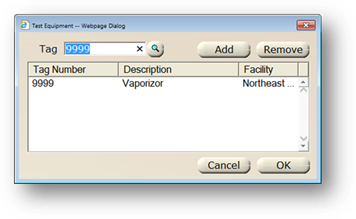
a) Enter the Tag Number of the test device or click Find to view the complete list of test devices.
NOTE: AIMS searches all facilities for test equipment.
b) Select the Test Device from the valid entry list.
c) Click OK
d) Click Add
11. Click OK to save the labor line.
Contract Labor
Use the contract labor tab to enter labor that is covered under a contract for the equipment or Job Type on this work order. This tab will be grayed out if the equipment or Job Type is not covered under a contract.
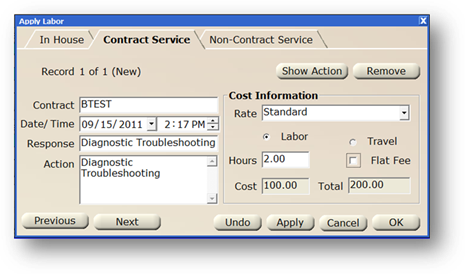
1. From the work order update tab, click Apply Labor.
2. The Contract field is a read-only field displaying the Control ID of the contract. If there are multiple contracts, select the contract’s control ID from the list.
3. Accept Date/ Time default (current date/time) or enter the date and time the work was completed.
4. Select a Response from the valid entry list.
5. Accept the Action default or enter additional information describing the work that was completed.
6. Select the Rate from the user defined contract rate valid entry list. Cost and Flat Fee fields may default based on pre-configured rate information.
7. Enter the Hours that it took to complete the work.
8. Check Flat Fee to enter a flat fee value for work that was completed. This will ignore the hours entered for the labor.
9. Enter the hourly Cost, or charge rate. This is Read-only field if a pre-configured rate was chosen from the Rate list.
10. Click OK to save the labor line and close.
Non-Contract Labor
Use the Non-Contract labor tab to enter and track labor that was performed by a service provider, or off-site vendor.
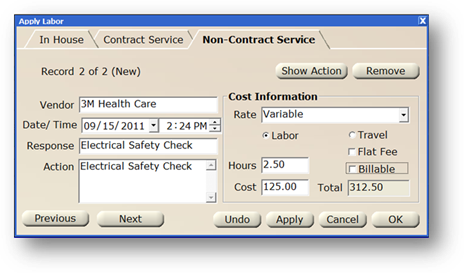
1. Select a Vendor from the valid entry list.
2. Select a Response from the valid entry list
3. Accept the Action default of the response you chose, or enter additional information describing work that was completed.
4. Accept the current Date and Time, or set the date/time the work was completed.
5. Choose a Vendor Rate from the valid entry list. The vendor rate list is user-defined in the Data Manager control. This will default the type of cost you are adding (labor/travel), whether it is a flat fee or not, and the cost.
NOTE: If you set up a vendor rate as variable, you can enter the cost on the labor line.
6. Select either Labor or Travel, depending on the nature of the entry applied to the work order. This may default and be read-only based on the rate type chosen.
7. Select Flat Fee if the cost entered is a flat fee.
8. Select Billable to flag this entry as billable. This can be used as a filter option when running certain reports.
9. Enter the Hours it took to complete the work.
10. Enter the hourly Cost of the work.
11. Total is a Read-only field indicating the Total Cost of the work unless Flat Fee is chosen, in which case you will enter the Total Cost as a Flat Fee.
12. Click OK to save changes and exit the Apply Labor Dialog.
13. Click Cancel to exit and discard entries.