Use the Purchasing Administration screen to set up default behaviors and options for the Purchasing control in AIMS. These options apply to those systems that have a Combined Facility Purchase Control. You can find this setting by going to the Multi-Facility tab of the Administration control. If the option is not checked, please see the how-to set up Facility-Specific Purchasing.
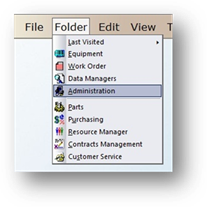
1. Open the Administration Control by clicking on the toolbar Administration or use the menu Folder > Administration.
2. Click the System Defaults Tab.
3. Click System Options.
4. Click the Purchasing Tab.
Purchasing Options
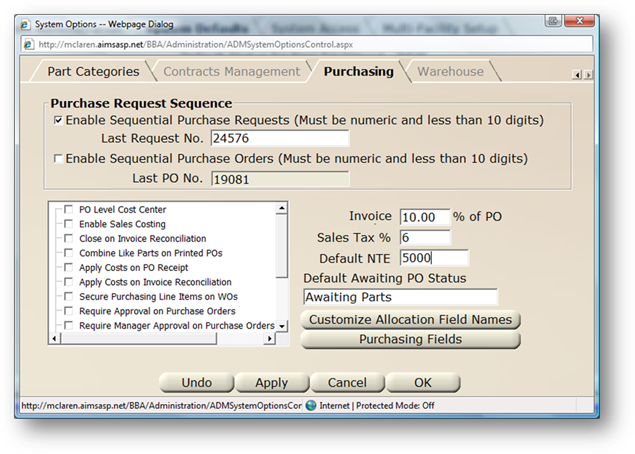
1. Click Enable Sequential Purchase Requests if you want AIMS to automatically assign purchase request numbers. Do not select this option if you want to use alpha-numeric Purchase Request Numbers. If activated, you can enter the number that you want AIMS to use as the next request number in the Last Request No. field.
NOTE: If you already have Purchase Requests entered with alpha-numeric characters, this option will not be available.
2. Click Enable Sequential Purchase Orders if you want AIMS to automatically assign purchase order numbers. Do not select this option if you want to use alpha-numeric Purchase Order numbers. If activated, you can enter the number that you want AIMS to use as the next request number in the Last Request No. field.
NOTE: If you already have Purchase Orders entered with alpha-numeric characters, this option will not be available.
3. Click PO Level Cost Center if you want to apply the Cost Center to the Purchase Order at the PO level and have that cost center apply to all line items on the PO. The Cost Center for Purchase Orders will otherwise be selected for each line item individually, but you will have the opportunity to change it.
4. Select Enable Sales Costing if you want to mark up the cost of line items entered on Purchase Orders.
5. Select Close on Invoice Reconciliation to have AIMS automatically close the PO when invoices have been received and checked as Reconciled to Invoice.
6. Select Combine Like Parts on Printed POs if you want the purchase order to only show a given part one time on a PO, with the total number ordered. Otherwise, if you have a PO with one part for multiple work orders, it will display one line for each work order.
7. Select Apply Costs on PO Receipt if you want to apply costs to associated work orders when the PO line item is received. This will update the work order with the price on the PO line item on purchase order receipt.
8. Select Apply Costs on Invoice Reconciliation if you want to apply costs to associated work orders when the PO is invoiced.
9. Select Secure Purchasing Line Items on WOs to secure work order line items that are attached to a PO so they can only be updated via the Purchasing Control.
10. Select Require Approval on Purchase Requests if you want to require approval of purchase requests. This will prevent purchase orders from being created until the request has been approved.
11. Select Require Manager Approval on Purchase Requests if you want to require manager approval for purchase requests. This will prevent purchase orders from being created until the request has been approved by a manager. Only employees configured as a manager will be able to approve the request.
12. Select Only Require Approval When Request Exceeds NTE if you want to require approval of a purchase request only if it exceeds a pre-determined “Not To Exceed” value.
NOTE: It may be useful to combine this option with other options, such as Require Manager Approval. For instance, if you only want to require manager approval if the request exceeds a certain value, check both this option and the “Require Manager Approval” option.
13. Select Require Approval on Purchase Orders if you want to require approval of purchase orders. This will prevent purchase orders from being ordered until the PO has been approved.
14. Select Require Manager Approval on Purchase Orders if you want to require manager approval for purchase orders. This will prevent purchase orders from being ordered until the PO has been approved by a manager. Only employees configured as a manager will be able to approve the PO.
15. Select Only Require Approval When PO Exceeds NTE if you want to require approval of a purchase order only if it exceeds a pre-determined “Not To Exceed” value.
NOTE: It may be useful to combine this option with other options, such as Require Manager Approval. For example, if you only want to require manager approval if the PO exceeds a certain value, check both this option and the “Require Manager Approval” option.
16. Select Require Approval on Invoices and Credit Memos if you want to require approval of invoices and credit memos.
17. Select Require Manager Approval on Invoices and Credit Memos if you want to require manager approval on invoices and credit memos. Only employees configured as managers will be able to approve invoices or credit memos.
18. Select Only Require Approval When Invoice Exceeds Allowed Variance if you only want to require approval of invoices and credit memos when the difference between the invoice and the PO exceeds a pre-determined percentage. This value is entered in the “Invoice Within ___ % of PO” field.
19. Select Update PO on Invoice if you want to update purchase orders with the values entered on the Invoice.
20. Select Update Work Order on Invoice if you want to update the work order with the values entered on the Invoice.
21. Select Update PO on Credit Memo if you want to update the purchase order line item to reflect the credit amount.
22. Select Update Work Order on Credit Memo if you want to update the work order line item to reflect the credit amount.
23. Create User-Defined purchasing Fields or Allocation Fields (optional).
⋅ Populate Purchasing Fields with the options you frequently use on purchase orders (optional).
NOTE: You can configure user logons to prompt the user to update PO’s and WO’s, giving them the option to update on receipt or invoice.
Allocation Field Names
Use the Customize Allocation Field Names to add User-Defined Fields to the Purchasing control.
1. Open the Administration Control by clicking the toolbar Administration button or using the menu Folder > Administration.
2. Click the Multi-Facility Setup Tab.
3. Highlight a Facility.
4. Click Edit.
5. Click the Purchasing Tab.
6. Click Customize Allocation Field Names.
7. Enter one or more Field Names.
8. In order to have the newly added field show up in Purchasing, you must check the Active checkbox.
9. If you want to view the code instead of the description, check the Display Code option.
10. Choose PO Level if you want the allocation fields to apply to all line items on a PO.
NOTE: Subsequent line items will all default to the value(s) entered on the first line item and cannot be changed.
Purchasing Fields
AIMS allows you to enter User-Defined options for valid entry fields in the Purchasing control such as Pricing Method, Invoice Type, Ship Via, Unit of Measure and Priority. In addition to these default fields, you can also create user-defined fields called Allocation Fields and enter values for them as well.
1. Open the Administration Control by clicking the toolbar Administration button or using the menu Folder > Administration.
2. Click the Multi-Facility Setup Tab.
3. Highlight a Facility.
4. Click Edit.
5. Click the Purchasing Tab.
6. Click Purchasing Fields.
Purchasing Fields
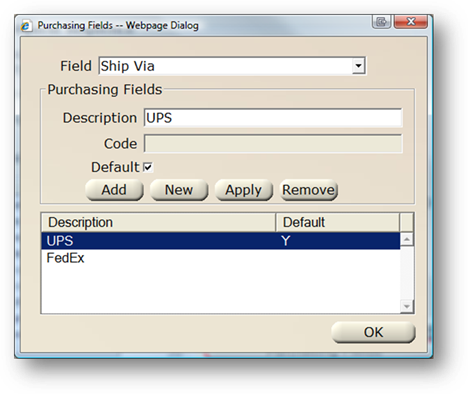
1. Choose a field name from the Field valid entry list.
NOTE: If you have added Purchasing Allocation Fields, they will also be displayed in this valid entry list.
2. Enter the Description of the item that will appear in the valid entry list in the Purchasing control.
3. Enter the Code, if applicable. Only allocation fields will allow code entry.
4. Select Default if the option you are entering is the default option.
5. Click Add to add the option to the valid entry list.
6. Repeat steps 1 through 5 for each additional option.
7. Click OK to return to the Administration control.