Use the Assorted Settings to configure additional behaviors and defaults for EasyNet Plus.
1. Log into EasyNet Plus
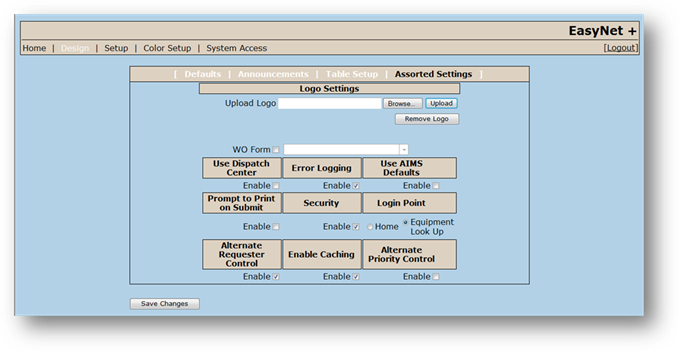
2. Click the Setup link in the menu bar.
3. Click Assorted Settings Link in the Setup menu bar.
4. Set up a Logo to be displayed in EasyNet Plus:
⋅ Click Browse to browse to the location of the graphic you want to use as the EasyNet Plus logo.
⋅ Click Upload to upload your logo. The Logo displays in the upper left corner of all EasyNet Plus screens.
NOTE: You must grant Read/Write/Modify permissions to the Network Services user on the EasyNet Plus folder in your web-root folder in order for the EasyNet Plus Logo to work properly. See your I.T. staff for assistance in configuring this.
5. Enable WO Form and select the form from the valid entry list to print custom work orders.
NOTE: Custom work order forms must be created using the Report Designer optional component. If you do not own the component, contact AIMS support for a quote.
6. Enable the Use Dispatch Center option to activate connection to the Dispatch Center Optional Component and enter the Dispatch Center Web Service URL.
7. Select Error Logging to have EasyNet Plus log any errors such as Work Requests that are not sent, software errors, etc.
⋅ Click the View Logs label to view the Error Log.
NOTE: You must grant Read/Write/Modify permissions to the Network Services user on the EasyNet Plus folder in your web-root folder in order for the View Logs label to be visible. See your I.T. staff for assistance in configuring this.
8. Select Use AIMS Defaults to have EasyNet Plus use the settings from the Equipment Tag in AIMS as defaults for the Building, Cost Center and Location fields.
9. Select Prompt to Print on Submit to be prompted with the option to print the work order if AIMS is not set to immediately print Easy Net Plus work orders.
10. Select Security to enable Login Security; you must then select a login point.
⋅ Select Home to require users to log in when loading EasyNet Plus
⋅ Select Equipment Look Up as the login point to require users to log in when attempting to access the equipment lookup function.
NOTE: With this option, users will still be able to use EasyNet Plus and submit work orders without logging in.
11. Activate Alternate Requester Control to change the requester field from a free form text field to a valid entry list that populates from entries in your Customer Service Address Book.
NOTE: The Alternate Requester Control must be an unhidden field in Design for this feature to work.
12. Select Enable Caching to have EasyNet Plus cache pertinent information from the previously submitted Work Order. Streamlining data entry for subsequent work order requests as well as Equipment and Work Order Lookups.
13. Select Alternate Priority Control to have the valid priorities appear as radio button options.
14. When setup is completed, click Save Changes.