
1. Open the Work Order Control by selecting the Work Order from the toolbar or by using the menu Folder > Work Order.
2. From the menu bar, go to Tools > Work Orders > Alerts Tracker.
Alerts List
1. The Last Update field displays the last date alerts were updated. Click Get Latest to download the latest updates.
2. Use the Alerts Filter area to filter the list of alerts that are displayed.
3. Double click an Alert to open the Alert.
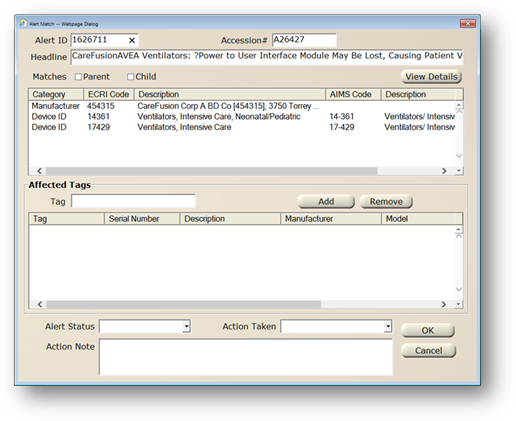
Alert Match
NOTE: To view additional information about the Alert from the ECRI web-site, click View Details. This will open the ECRI web page login screen. Enter your ECRI credentials and click Sign In.
1. Parent/Child – check to display any Parent and/or Child Codes related to the Alert selected on the previous screen.
2. Enter Equipment related to the Alert. The Affected Tags area will auto-populate those Equipment Tags matching the Manufacturer and Equipment Type for the Alert.
NOTE: If no AIMS Codes (Equipment Type or Manufacturer Code, depending on the Category) and descriptions are listed, this means that no match was found for that Manufacturer or Equipment Type. You can double click that line item to Manually Link the ECRI Manufacturer or Equipment Type with one of your AIMS Manufacturer/ Equipment Types.
To add additional Tags to the Affected Tags List, select Equipment Tags from the Tag field in the Affected Tags area. Alternatively, use the Zoom button (Z) to search for tags.
3. Click Add to add each Tag to the valid entry list. These will be the Tags for which you either want to indicate that the Alert is not applicable, or that you want to open Work Orders for corrective action for.
⋅ Use the Remove to remove Tags from the list.
4. Highlight the Tags using the mouse.
5. Select an Alert Status.
⋅ Choose Not Applicable to indicate that the Alert does not apply to the selected Tags.
⋅ Choose Applicable Open to indicate that the Alert applies to the selected Tags and if a Work Order is to be opened.
6. Select an Action Taken.
⋅ Choose Issued Work Order to Batch Open Work Orders.
⋅ Choose Other if another action is to be taken. This will not result in the Batch Open Work Orders screen.
7. If Applicable Open was selected as the Alert Status and Issued Work Order was selected as the Action Taken, click OK to proceed to the Batch Open Work Orders screen.
8. Create Work Orders by completing the Batch Work Order function.
NOTE: It is recommended that you create a Work Order type to be used specifically for Work Orders created for Alerts.