Find - Click on the toolbar
Find Button. The dialog opens.
Find - Click on the toolbar
Find Button. The dialog opens.
To access any of the Special Features, you must be in the Dispatch Center component Control.
Find - Click on the toolbar
Find Button. The dialog opens.
Find Work Order
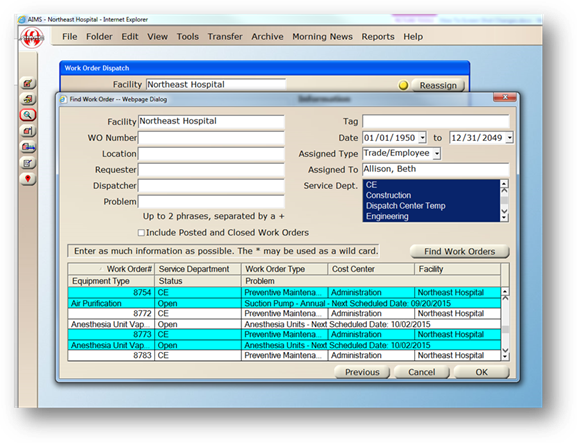
Enter as much information as possible and/or use the wild card option [*]. The more fields entered the quicker the search and the more accurate the results.
1. Facility – Select from the list.
2. WO Number – Enter the number.
3. Location – Enter the location.
4. Requester – Enter the name of the requester.
5. Dispatcher – Enter the dispatcher’s name.
NOTE: Dispatchers must first be set up in Data Managers → Employee to search using this field.
6. Problem – Enter the problem.
7. Tag – Enter the tag number.
8. Date from/to – Enter a date range to search.
9. Assigned Type – Select from the list.
10. Assigned To - Select from the list.
11. Service Department - Select one or more from the list.
12. Find Work Orders [Button] - Click on the button and the table fills displaying matches to the search criteria.
13. Table Headers - Click on a table header and the table sorts by that selection.
14. OK [Button] – With a work order highlighted in the table, click on the button to return to the Dispatch screen displaying the work order.
15. Cancel [Button] – Click on the button to cancel the Find feature and return to the previous screen.
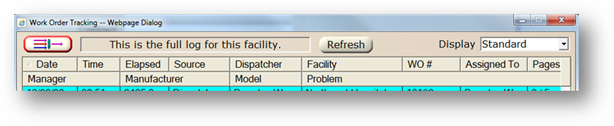
 Work Order Tracking - Click
on the toolbar Work Order Tracking button. The dialog
opens.
Work Order Tracking - Click
on the toolbar Work Order Tracking button. The dialog
opens.
Work Order Tracking
Work Order Tracking is used by managers and dispatchers to quickly view all or a filtered selection of open work orders and how many times they have been paged. This feature also provides quick access to the work order dispatch information to update and page.
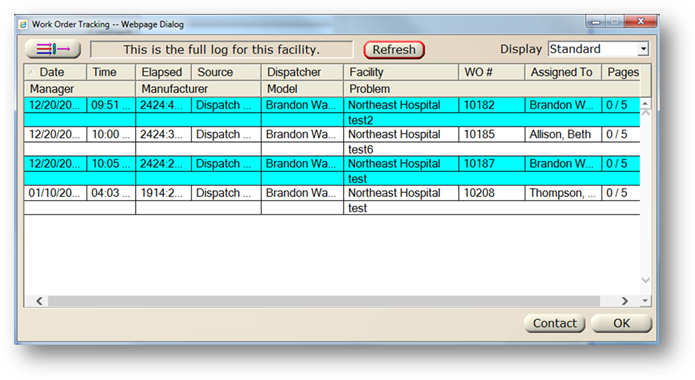
1. Click the Filter button to open the Work Order Tracking Filter.
2. Enter the Values in the Range Fields or select entries in the Filter List to filter the Work Order list.
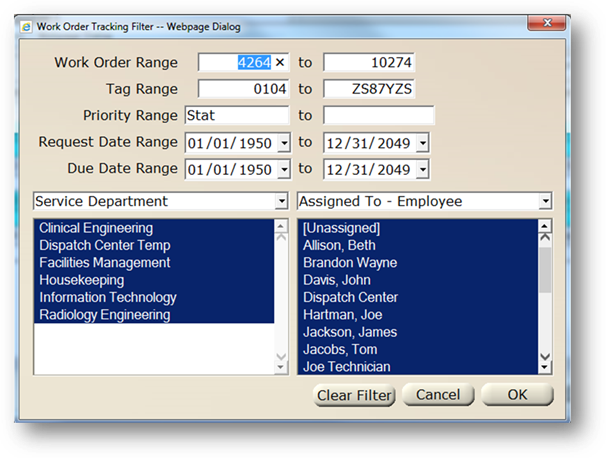
3. Click OK to apply the filter.
⋅ The filtered list is now displayed.
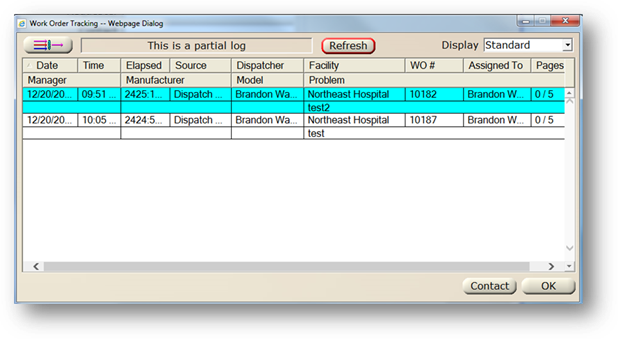
4. Display – Select Standard to view the screen as is. Select Expand to view the screen with a resolution of 1280 x 768.
Date – Displays date the work order was requested.
Time – Displays time the work order was requested.
Source – Displays the way the work order was requested; Dispatch Center, EasyNet, etc.
Dispatcher – Displays the login name of the dispatcher.
Facility – Displays the facility for the work order.
Work Order Number – Displays the work order number.
Assigned To – Displays the technician assigned the work order.
Pages – Displays how many times the work order has been paged to the technician, followed by how many pages will be attempted.
•Based on setup in Tools > Escalation Setup.
Manager - Displays how many times the work order has been paged to the manager, followed by how many pages will be attempted.
•Based on setup in Tools > Escalation Setup.
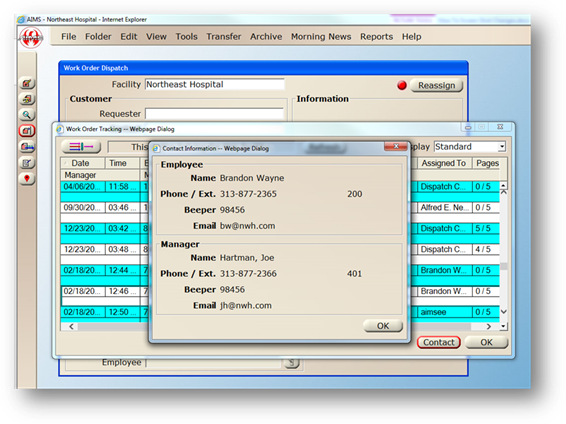
5. Contact [Button] – Click on the button to display contact information for the employee and the manager.
6. OK [Button] - When finished viewing, click on the button to return to the previous screen.
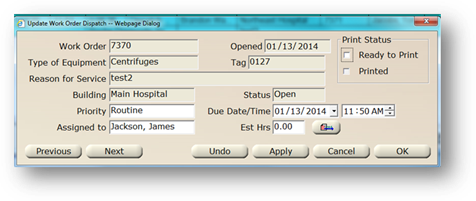
Update Work Order Dispatch Information
This feature provides quick access to update priority, due date, assigned to and estimated hours. You can also set the work order to Ready to Print and page the technician. Grayed fields in the dialog are view only.
1. Double Click on a work order in the grid to open the Update Work Order Dispatch screen.
2. Check Ready to Print to set the print status to “ready to print”.
3. Priority – Accept the default or select from the list.
4. Due Date/Time – Accept the defaults or edit.
5. Assigned To – Accept the default or edit.
6. Est. Hours – Accept the estimated hours or edit.
•Conversion is 60 minutes = 1.00; 45 minutes = 0.75; 10 minutes = .17 etc. Accepts hours from 0.01 to 999.99.
7. Click on the Page Button to send a page to the technician.

Paging - Click on the toolbar Paging Button. The dialog opens.
Paging
Paging can be used to send a text message to one or more employees.
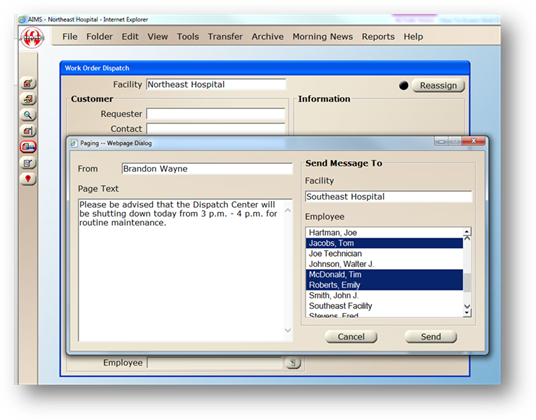
1. From – Select a sender from the list or enter free form text.
2. Page Text – Enter the text message to be paged.
3. Facility – Select a single facility from the list.
4. Employee – The employee list filters by the facility selected. Highlight one or more employees in the list.
5. Send [Button] – Click on the button to send the message.
6. Cancel [Button] – Click on the button to cancel the message.

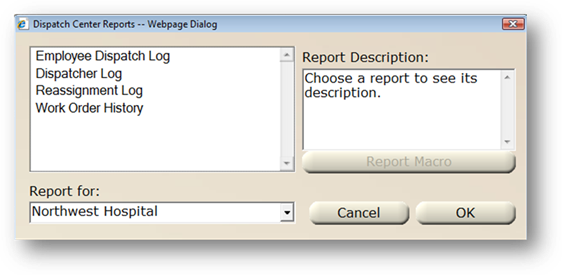
Reports – Click on the button to access the Dispatch Center Reports.
Reports
Dispatch Center Reports