 |
Reassign [Button] –
⋅ The light blinks red if there is a Dispatch Center work order that needs to be reassigned. Click on the button and the dialog opens.
⋅ The light is black if no work orders require reassignment.
⋅ The light blinks yellow if an EasyNet Work Order needs to be reassigned.
⋅ The light alternates between blinking red and yellow if Dispatch Center and EasyNet Work orders need to be reassigned.
Reassignment Log
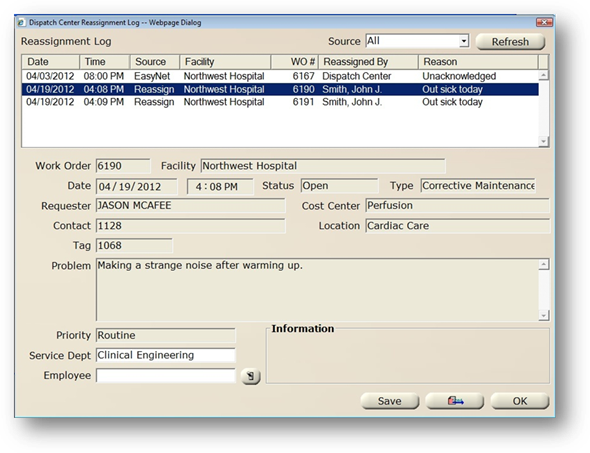
1. Source – Select the view.
⋅ “All” displays all work orders routed through Dispatch Center.
⋅ Reassignment displays only work orders that have been requested to be reassigned by technicians or EasyNet Request work orders that require reassignment.
2. Refresh – Click on the button and the table displays the requested source.
3. Table – Highlight a work order and the corresponding information displays below.
⋅ Most fields are view only with the exception of Service Department and Employee to enable the dispatcher to reassign the work order.
4. Service Department – Accept the default or select from the list.
⋅ If you Tab off the Service Department field, the Employee Selection dialog displays. If you click on the Employee magnifying glass, the Employee drop down list displays.
5. Employee – Select from the list.
6. Click on Save when entries are completed.
⋅ AIMS provides a message in the Information box that the work order has been reassigned.
⋅ The button will become inactive when reassignment is completed.
Page [Button] – Click on the button to page the technician.
⋅
 The button becomes inactive after
the work order is paged.
The button becomes inactive after
the work order is paged.
7. When reassignment(s) are completed, click on OK to return to the previous screen.