The Global PM Schedule Change function in AIMS allows you to quickly change multiple PM schedules.
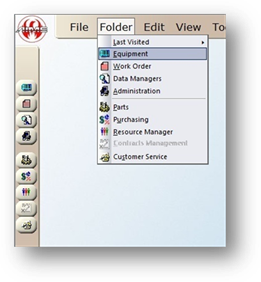
1. Open the Equipment Control by clicking on the Equipment button on the main screen or by selecting Folder > Equipment.
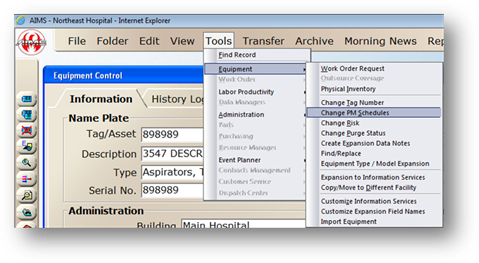
2. Click the Global Change button on the toolbar or by selecting Tools > Equipment > Change PM Schedules.
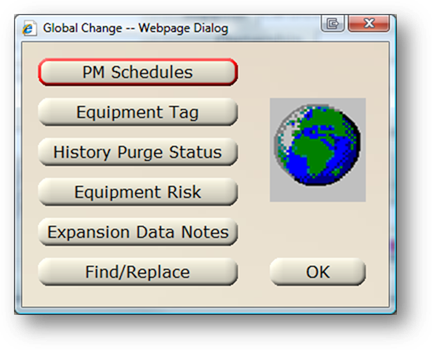
Global Change Dialog
3. Click on the PM Schedules button.
Change PM Schedule
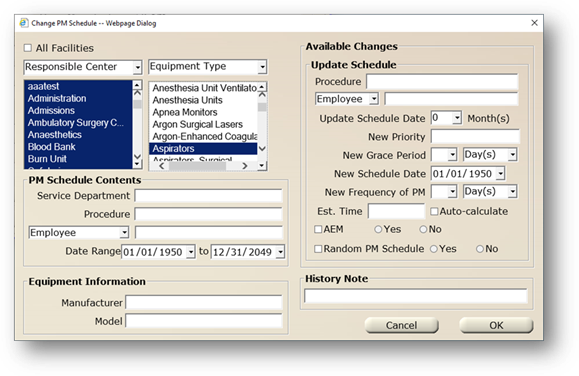
NOTE: Filters only need to be selected if they apply to the equipment for which PMs are being updated.
There are two valid entry lists on this screen that will allow you to select from and filter by the following: Building, Responsible Center, Cost Center, Equipment Type and Equipment Status. Select the filter you want to use and choose the values associated with the equipment PM schedules to be updated.
PM Schedule Contents
NOTE: Only use those fields that apply to all PM schedules you are updating. Leave fields blank otherwise.
4. Select a Service Department from the valid entry list to update PM Schedules for a certain service department.
5. Select a Procedure from the valid entry list that is associated with the PM schedule(s) to be updated.
6. Choose an Employee or Provider and then choose a Specific Employee/Provider that is associated with the PM schedule(s) to be updated.
7. Enter a Date Range to update PM Schedules with a Next Date within a specified range.
Equipment Information
8. Select the Manufacturer from the valid entry list that is associated with the PM schedule(s) to be updated.
9. Select the Model from the valid entry list that is associated with the PM schedule(s) to be updated.
Update Information
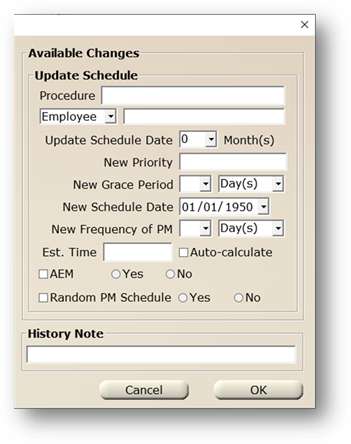
NOTE: Enter only the information applicable in the Update Information section that you want to update on the PM Schedules. If you do not want to change a field on the PM schedule, leave it blank.
10. Choose the Procedure that will replace the existing procedure on the PM schedule(s).
11. Choose an Employee or Provider and then choose a Specific Employee/Provider that you want to assign to the affected PMs.
12. Choose the Number of Months the PM Schedule(s) is to be updated. Negative months will subtract from the existing schedule date, whereas positive months will add to the existing schedule date.
13. Choose a New Priority from the valid entry list.
14. Select a New Grace Period for which the PM Schedule(s) is to be updated.
15. Enter the New Schedule Date that is to be the next date the PM Schedule is due.
16. Select the New Frequency of PM and unit of time that is to be the new PM frequency.
17. Enter the Estimated Time that is to be the new estimated time to perform the PM.
18. Check Auto-Calculate to have the system calculate the new estimated time to perform the PM based on the average time required on previous work orders to perform that procedure for that Equipment Type or Model (model takes precedence). If there are no prior work orders, the estimated time will be set to “0”.
NOTE: Updating the Estimated Time does not update the default PM Schedule. Only schedules on equipment tags are updated.
NOTE: If you do not wish to make all available changes, leaving the defaults will not change the PM schedule. For instance, if you do not wish to change the New Schedule Date, leaving the default New Schedule Date of 01/01/1950 will not alter the PM schedule.
19. Select AEM Yes or No to update the AEM setting on PM Schedules for Equipment Types that have been Reviewed and are AEM Eligible.
NOTE: Only eligible tags will appear on the selection screen.
20. Select Random PM Schedule Yes or No to update the Random setting on PM Schedules.
21. Enter additional text in the History Notes to be displayed in the History Log for the Equipment to be updated.
22. Click OK to display the selection screen.
NOTE: Changes will not be made at this point.
23. Select PM Schedules to Change. Hold the [Control] key or [Shift] key on the keyboard to select multiple Equipment.
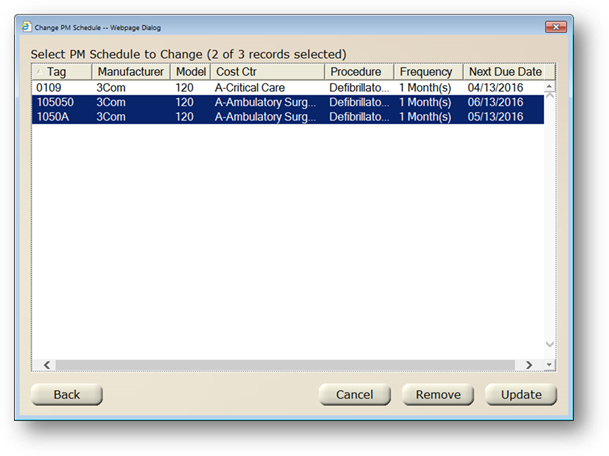
24. Click Update button to update PM Schedules selected.
![]()
25. To remove PM Schedules from equipment meeting the search criteria, click Remove.
26. Click Back button to go back to the Change PM Schedule dialog, click Cancel button to discard entries and exit the Find/Replace function, or click Remove button to remove selected PM schedules.
NOTE: The message “You are about to make changes to [#] PM Schedule(s). Do you want to continue?” displays. Click Yes to make the changes or No to cancel the changes.