AIMS provides the opportunity to track parts that can be exchanged for a rebate. This can be useful if you get reimbursed for parts traded in for new parts.
NOTE: You must own the Exchange Parts optional component in order to be able to use the exchange parts feature.
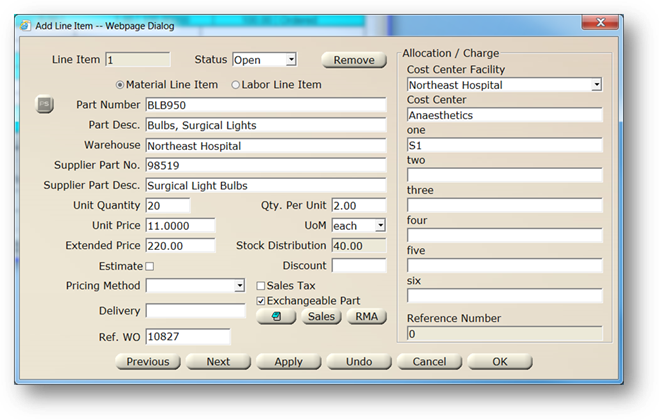
1. The Status field displays the status of the line item.
2. Choose Material Line Item by clicking the associated radio button.
3. Enter the AIMS Part Number you are sending back.
NOTE: If the Part Number is unknown, it can be found by using the Find function activated by clicking the button to the right of the field.
4. Enter a Part Description. This defaults after you have entered the part number if it was configured with a description.
5. Enter the Supplier Part Number The supplier part number may default based on the vendor you selected and the AIMS part number you entered.
6. Enter the Supplier Part Description. The supplier part description may default based on the vendor you selected and the AIMS part number you entered.
7. Enter the Unit Quantity being returned. If you’ve configured “Packs” of parts, enter the number of “packs”. AIMS will automatically calculate the total number of parts to be deducted from inventory.
8. Enter the Quantity Per Unit. If you have configured “packs” of parts, this may default to the number of parts per “pack”.
For example, if you were returning batteries that came 12 per pack and you were returning 5 packs, the Unit Quantity would be 5 and the Quantity Per Unit would be 12. AIMS will automatically calculate the Stock Distribution, or actual quantity of batteries you were returning.
9. Enter the Unit Price. This would be the price per “pack”, if applicable. Otherwise, just the price per part.
10. Enter the Unit of Measurement, if applicable.
11. The Extended Price displays a read only value with the total price for the line item.
12. The Stock Distribution displays a read only field with the total amount of items being returned. [Unit Quantity * Quantity Per Unit.].
13. Check the Estimate checkbox to indicate that the price is an estimate.
14. Enter the Discount as a dollar amount or a percentage. The Discount will be subtracted from the total, or Extended Price, and also update the Unit Price accordingly.
15. Select a Pricing Method from the valid entry list. You must populate the Pricing Method list before selections will be available.
16. Check if Sales Tax is to be applied. You can set up the sales tax for your area in the purchasing system options.
17. Click if the part is an Exchangeable Part. This will allow entry of an RMA for returning a part.
NOTE: You must own the Exchange Parts optional component to use this feature.
18. Click the RMA button
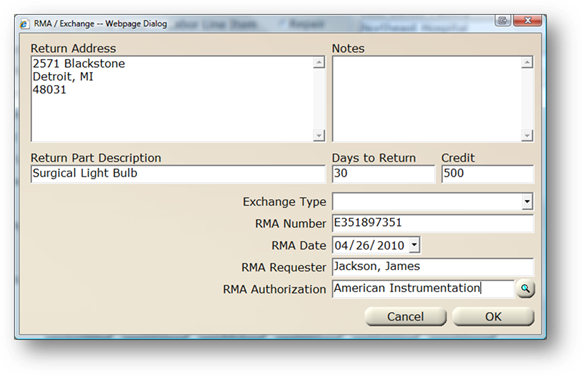
⋅ Fill out the RMA information
⋅ Click OK to save the RMA information
19. Enter Delivery information.
20. Click the Note button to enter miscellaneous notes for this line item.
21. Select the AIMS Warehouse where stock will be received into. You do not have to enter a warehouse if you did not use an AIMS part number on the line item.
22. Enter the Reference Work Order number that the line item is for. This may default if you have entered a work order on the request information screen.
23. Click OK to save the request.
24. Click Create PO to create a purchase order for this request.
NOTE: You can add multiple requests to a single purchase order. If you want to add this request to an existing purchase order, do not click Create PO and continue to the Purchase Order how to.