
The dispatcher enters work request information, assigns the work order, and then pages the work order to the appropriate technician. Work orders can also be reassigned.
Work Order Dispatch – Click on the button and the dialog opens.
Work Order Dispatch
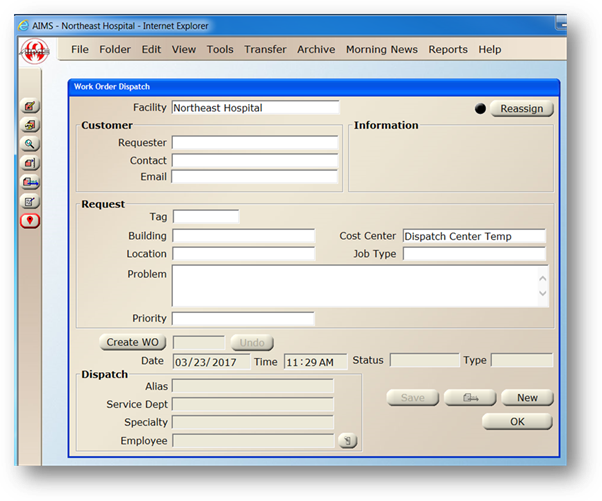
1. Facility - Select a Facility from the drop down list.
NOTE: The Up/Down buttons used in Associate Regions and Facilities are used to place this list in the best order for dispatchers.
Customer Section
1. Requester –Select from the list or enter the requester.
NOTE: List is populated from the Address Book in Customer Service.
NOTE: Once a Requester is entered, it is possible that the Contact and Email may default at this time. They can be changed.
2. Contact – Enter the contact for the Work Order.
3. Email – Enter the email for the Requester
Request Section
1. Tag – Enter the Tag or use the Find Feature.
NOTE: This is presently not a required field in Dispatch Center. If this is a required field in AIMS, it will be necessary to add the Tag to the work order in the main AIMS database before closing the work order.
2. Building – Select from the list.
3. Cost Center – If a Tag is entered, field defaults to the Cost Center assigned to the Tag. Accept the default or select from the list.
NOTE: Upon opening a new Dispatch Center work request, this field initially defaults to “Dispatch Center Temp”.
4. Location – Enter the equipment location. If you have configured a location hierarchy, click the Switch button to assign the location.
5. Job Type – Enter the job type.
6. Problem – Enter the problem.
7. Priority – Select from the list.
NOTE: Priority selected will determine the number of page attempts and when and if the manager will be paged as defined in Escalation set up.
8. Create WO [Button] – Click on the button to create the work order in Dispatch Center and the main AIMS database.
NOTE: If “Use Resource Manager Defaults for Assignments” is checked, the Resource Manager defaults will display when the Create Work order button is clicked.
NOTE: The button is deactivated and the work order number displays in the adjacent field. This also activates the Date, Time, Status and Type fields.

9. Date – Accept the default or change it.
10. Time – Accept the default or change it.
11. Status – Accept the default or change it.
NOTE: Default is set up in Administration > Defaults >Default Priority for New Work Orders.
12. Type – Accept the default or change it.
NOTE: Default is set up in Administration >Defaults >Default Work Order Type for new Work Orders.
Dispatch Section
Dispatch Center has different options to assist in assigning employees to work orders.
§ Google Map – Allows assignment directly from a map view based on an employee’s proximity to a facility.
§ Alias – Auto populates Service Department and Specialty fields and filters available employee list based on keyword association with Service Departments and Specialties.
§ Service Department – Presents an Employee Selection Screen based on Service Department assignments.
Google Map
1. Click on the Pin Button in the Toolbar.
A map displays showing Facility location and Employee locations.
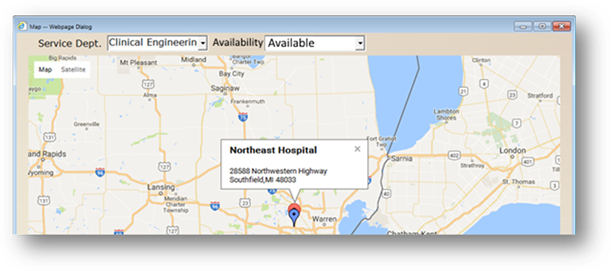
•Red pins represent the location of the Facility on the work order.
•Blue pins represent Employee locations.
2. Service Department – Select a Service Department to limit results to only those Employees who are assigned to that Service Department.
3. Availability – Select Available to limit results to only those Employees who are available.
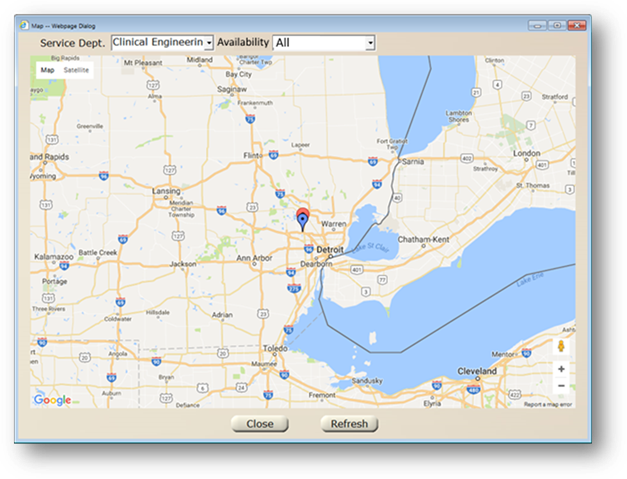
4. Click on a Red pin to reveal facility information.
5. Click on a Blue pin to reveal employee information.
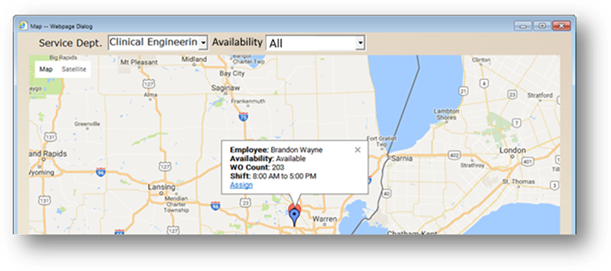
6. Click on Assign to assign the employee to the work order.
7. Click on Close.
⋅ You are returned to the WO Dispatch Screen.
⋅ Your assignment is displayed in the Employee field.
Alias
1. Free form type in a Keyword or select from a pre-defined list.
⋅ The Service Department and Specialty fields will auto populate based on selection.
⋅ The Employee valid entry list will then be filtered by Service Department assignment.
Service Department
1. Select from the list. Then [Tab].
⋅ Depending on Region setup, one of the following will display:
If “Use Resource Manager Defaults for Assignments” is checked, the Resource Manager defaults will display when the Create Work order button is clicked.
If “Auto Display Employee Selection Screen” is checked, the employee selection screen will display employees that are assigned to the Service department entered.
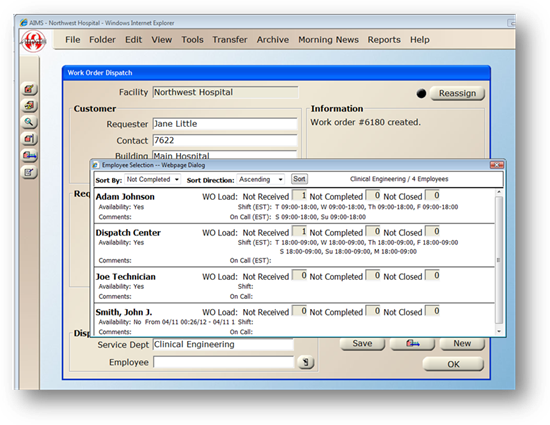
Employee Selection Dialog
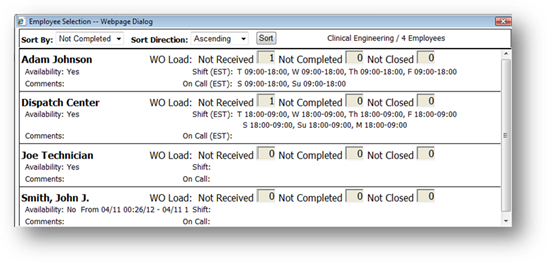
2. Sort By – Select the sort you would like used to view the employees.
3. Sort Direction – Select ascending or descending.
4. Sort [Button] – Click on the button and the employee lists sorts based on selections.
⋅ The area to the right of the button displays the Service Department and quantity of employees assigned to the Service Department.
WO Load
Employee – Displays the employee name.
Not Received – Quantity of work orders paged but not acknowledged as received by the technician.
Not Completed – Displays the number of work orders received but not completed.
Not Closed – Displays the quantity of work orders received and completed, but not closed.
NOTE: Work orders are closed in the main AIMS database
Availability – Displays the employee’s status – Yes, available or No, not available.
Shift – Displays the employees’ available work dates and times.
On Call – Displays the employee’s on call times.
5. Click on an employee in the table to add the employee to the Work Order.
⋅ You are returned to the previous screen with your selection displayed in the Employee field.
Save [Button] – Click on the button to save the Work Order.
⋅ The button becomes inactive after the work order is saved.
 Page [Button] – Click on the
button to page the technician if Auto Page AIMS is not setup.
Page [Button] – Click on the
button to page the technician if Auto Page AIMS is not setup.
⋅ The button becomes inactive after the work order is paged.
New [Button] – Click on the button to begin a new work request.
NOTE: The Facility field defaults to the previous Facility selected.