Add Parts to your AIMS system to be able to search Warehoused Parts, add them to Work Orders and Schedule Part Reordering.
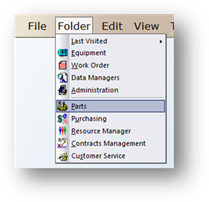
1. Open the Parts Control by clicking on Parts from the main screen or by the menu Folder > Parts.
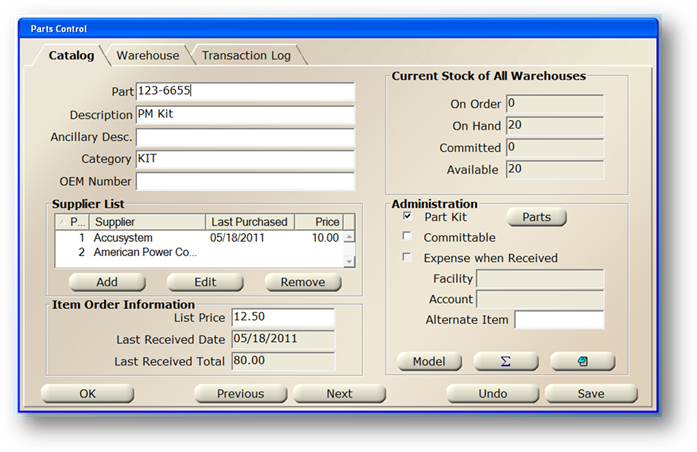
Catalog Tab
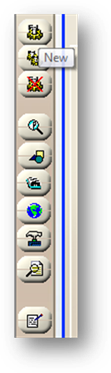
2. Click New in the toolbar
Item
3. Enter a new Part Number in the Part field and [Tab] – this will clear the screen for creation of a new part.
4. Enter a Description of the new part.
5. Enter a secondary description of the new part in the Ancillary Field, if applicable.
6. Enter a Part Category or select it from the valid entry list.
7. Click Save to save the new part.
Supplier List
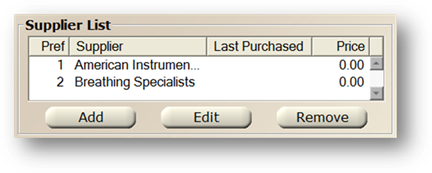
8. Click Add to add preferred suppliers.
Supplier

9. Select a Part Supplier from the valid entry list.
10. Once a supplier is selected the Customer Number field will default based on the Data Manager setup.
11. Accept the Preference default or enter the Preference Number of the Supplier. This describes the order in which the Suppliers will appear in applicable fields throughout AIMS.
12. Enter the supplier Part Number.
13. Enter the supplier part Description.
14. Enter the usual Qty Per Unit, or number of parts that this supplier ships. For example, if 12 batteries come together in a pack, you would enter “12”.
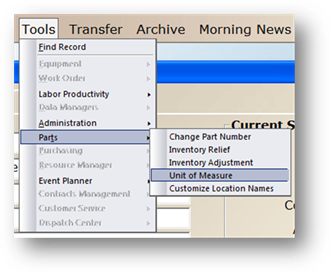
15. Select a Unit of Measure from the valid entry list.
NOTE: Units of Measure are customizable from the Tools menu.
16. Enter the supplier Minimum Allowed Order Quantity.
17. Enter the supplier List Price.
NOTE: The List Price will update automatically on PO Receipt and/or Invoice Reconciliation if Apply Costs on PO Receipt and/or Apply Costs on Invoice Reconciliation are enabled.
18. Enter the supplier Delivery Lead Time in Days.
19. Click OK to save and exit the Supplier dialog.
Current Stock of All Warehouses
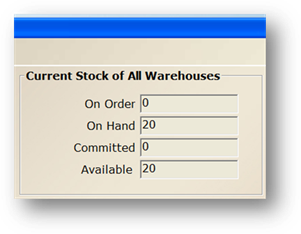
The system maintains and displays up-to-date Warehouse stock information. Fields are view only and will be zero for newly added parts.
•On Order – Displays quantity on order across all warehouses. Includes only orders with a Purchaser Order status of “Ordered”.
•On Hand – Displays quantity on hand across all warehouses
•Committed - Displays the quantity of on hand stock committed for use across all warehouses. The quantity is not available for general use.
•Available – Displays the quantity available across all warehouses
Administration
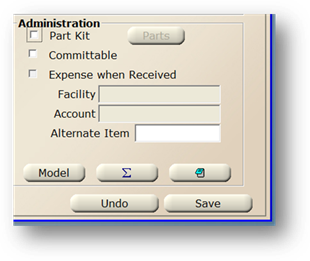
20. Check Committable to allow the new part to be a committable part, which means that a part can be issued to work orders even if there is no available quantity on-hand. This is a way of reserving parts that have not been inventoried yet.
21. Check Expense when Received to associate your new part with a cost center, which will be charged whenever you receive new quantities of the part.
NOTE: If this is not checked, parts are charged against cost centers when they are applied to work orders.
⋅ Choose Facility and Account that this part will be expensed to when received
22. Enter an Alternate Item, or part number for reference if this part quantity is 0.
23. Click the Model Button to associate this part with specific models.
24. Click Usage Summary button to get a basic usage history for this part.
25. Click the Notes button to enter miscellaneous notes relating to this part.
26. When all entries are completed, click Save to save the new part.